LEGO Bonsai Tree Instructions: Build Guide & Tips

The LEGO Bonsai Tree Set 10281 comes with a 245-page instruction booklet that guides you through building 878 pieces into either a green-leafed or pink cherry blossom display tree (according to Brickset). Your instruction manual should arrive in the box, though many builders report the printed version suffers from low-resolution images that make small details hard to distinguish. The digital PDF available from LEGO's website offers clearer visuals, and the LEGO Builder app provides an interactive alternative that lets you zoom into each step. Most builders complete this set in 3-4 hours, with the foliage attachment phase consuming roughly half that time.
Table of Contents
- Understanding Your LEGO Bonsai Tree Set 10281
- What's Included in the Box
- Accessing Your Building Instructions
- Preparing Your Workspace
- Step-by-Step Building Process and Timeline
- Phase 1: Building the Base and Pot (Bags 1-3)
- Phase 2: Trunk and Branch Structure (Bags 4-6)
- Phase 3: Attaching Foliage Elements (Bags 7-9)
- Common Building Challenges and Solutions
- Dealing with Small Pieces and Frog Elements
- Understanding the Instruction Quality Issues
- Branch Positioning and Stability Tips
- Customization Options and Display Tips
- Switching Between Cherry Blossoms and Green Leaves
- Alternative Build Ideas and MOCs
- Display and Long-Term Care
Understanding Your LEGO Bonsai Tree Set 10281
Before you open the box, understanding what's inside and how to prepare makes the difference between a smooth build and a frustrating one. This set requires more organization than typical LEGO builds because of the numerous small pieces and repetitive elements.
What's Included in the Box
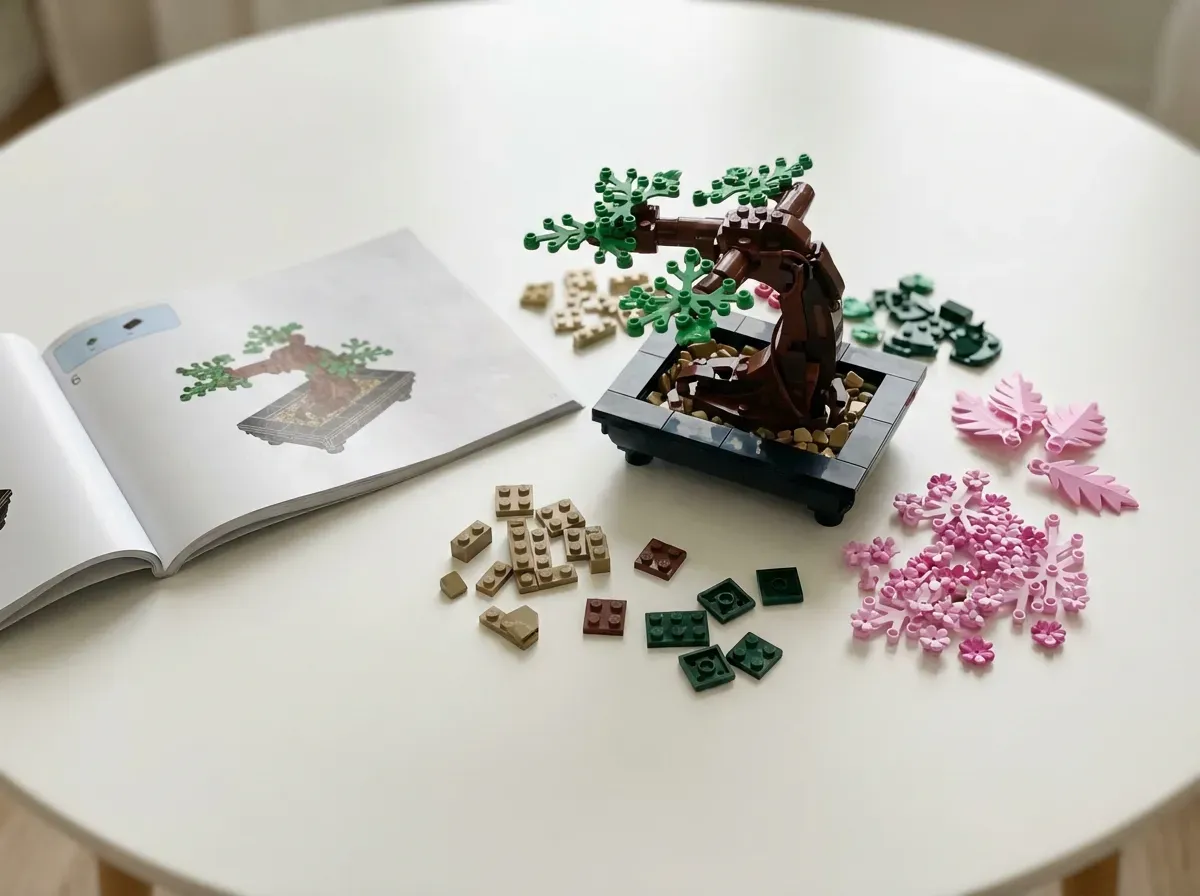
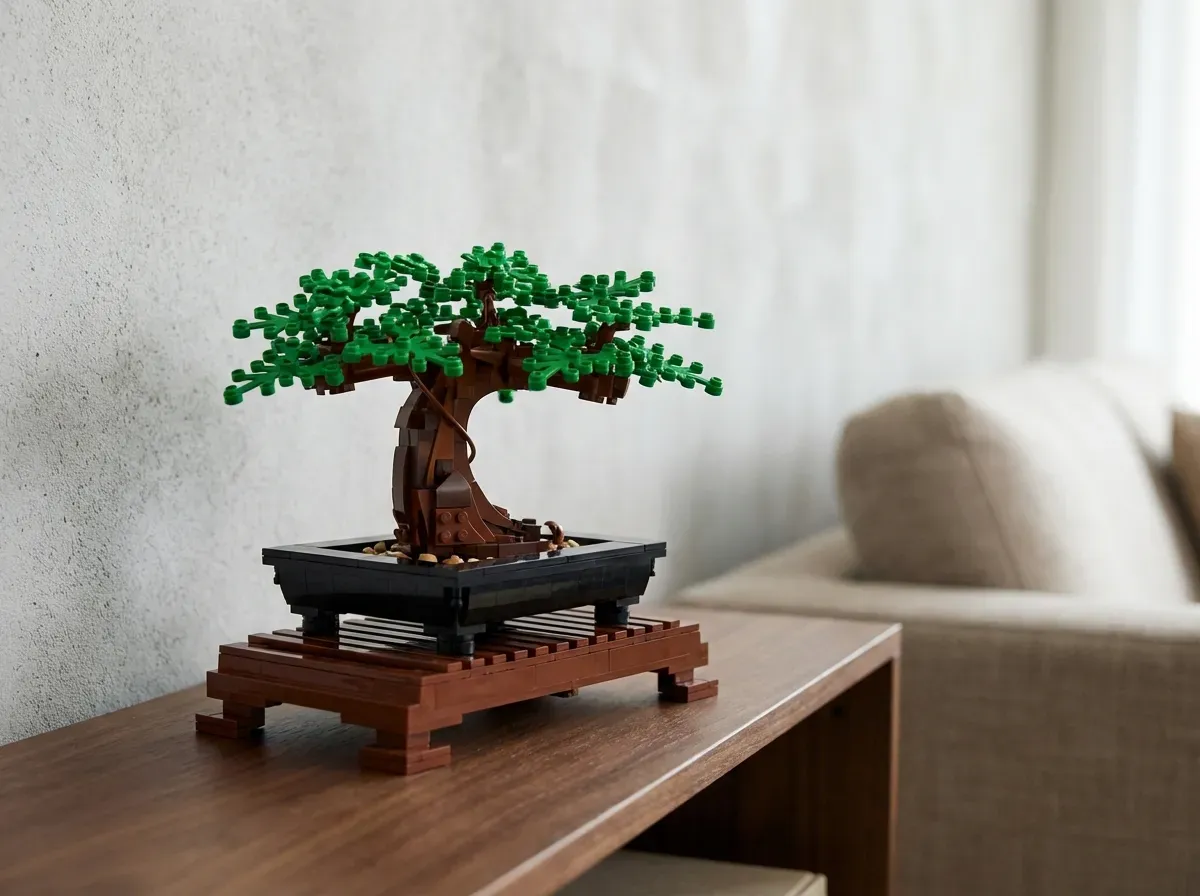
Your set contains 878 pieces packaged in numbered bags, along with that 245-page instruction booklet (according to Brickset). The pieces include 109 unique parts in 28 different colors, creating the variety needed for a realistic bonsai appearance (according to Rebrickable). You'll find two complete foliage options: 30 pink frog pieces for the cherry blossom version, plus green frog elements and leaf pieces for the traditional green tree.
The bags are numbered 1 through 9, with each number containing multiple smaller bags. This organization matches the building phases, pot, trunk, branches, and foliage. Well, the brown plates that form the trunk come in several bags, and you'll use pieces from multiple bags during the branch construction phase.
The completed model measures over 7 inches high, 8 inches long, and 7 inches wide (according to Brickset). That's substantial enough for desk or shelf display without dominating the space.
Accessing Your Building Instructions
The printed instructions in your box work fine for most steps, but Reddit users consistently report one significant issue: the printed booklet uses lower-resolution images that make small pieces difficult to identify (according to Reddit discussions). Look, this matters most during the foliage attachment phases where you're working with tiny elements.
Download the digital PDF from LEGO's website by searching for product number 10281 or navigating to their building instructions archive. The PDF shows sharper images and allows you to zoom in on your phone or tablet. The LEGO Builder app offers another option with interactive 3D views that you can rotate, though some builders find the app interface slower than simply flipping through a PDF.
Keep both the physical booklet and digital version handy. The booklet works better for tracking your overall progress, while the digital version clarifies confusing steps.
Preparing Your Workspace
Set aside a flat surface where your partially-completed build can remain undisturbed for several hours. The trunk and branch assembly creates a delicate structure that you don't want to move repeatedly. Good lighting becomes essential during the foliage phase when you're attaching small pieces to specific connection points.
Use small bowls or sorting trays to organize pieces from each numbered bag. This prevents the common frustration of searching through hundreds of small elements for one specific piece. Builders over 55 particularly benefit from strong overhead lighting and a magnifying glass for reading instruction details.
A comfortable chair matters more than you'd expect for a 3-4 hour session.
Step-by-Step Building Process and Timeline
The build progresses through three distinct phases, each with its own rhythm and challenges. Understanding what happens in each phase helps you pace yourself and know when to take breaks.
LEGO Bonsai Tree Set 10281 Instruction Format Comparison
| Instruction Format | Image Quality | Best Use Case | Advantages | Disadvantages |
|---|---|---|---|---|
| Printed Booklet (245 pages) | Low-resolution | Overall progress tracking | Physical reference, no device needed | Small details hard to distinguish, difficult during foliage phase |
| Digital PDF (LEGO Website) | High-resolution | Clarifying confusing steps, foliage attachment | Zoomable on phone/tablet, sharper visuals | Requires device, need to switch between formats |
| LEGO Builder App | High-resolution with 3D | Interactive learning, visual learners | Rotatable 3D views, engaging interface | Slower interface, less convenient than PDF for quick reference |
Understanding the instruction format's structure reveals how the building phases are strategically organized throughout the assembly process.
LEGO Bonsai Tree Set 10281 Building Phases Timeline
| Building Phase | Bags Included | Time Required | Main Tasks |
|---|---|---|---|
| Phase 1: Base and Pot | Bags 1-3 | 45-60 minutes | Build pot walls, create interior support structure, establish base stability |
| Phase 2: Trunk and Branch Structure | Bags 4-6 | 1-1.5 hours | Construct trunk with studs-not-on-top techniques, build branch framework, create bark texture |
| Phase 3: Attaching Foliage Elements | Bags 7-9 | 1.5-2 hours | Attach frog pieces and leaf elements, switch between pink cherry blossoms or green leaves |
Phase 1: Building the Base and Pot (Bags 1-3)
The rectangular pot with its textured surface takes 45-60 minutes to complete. You'll build the pot walls using dark tan and brown pieces that create a ceramic appearance, then construct the interior support structure that holds the trunk. This phase uses standard LEGO building techniques without complicated connections.
The pot's base uses larger plates that create stability for the entire model. Make sure these plates connect firmly, any looseness here affects the finished tree's stability. The textured exterior comes from alternating plate heights and colors, creating visual depth that mimics actual pottery glazing.
Phase 2: Trunk and Branch Structure (Bags 4-6)
Building the trunk requires 1 to 1.5 hours and introduces studs-not-on-top techniques where pieces attach sideways. The brown plates spiral around a central core in a pattern that creates bark-like texture (according to Reddit reviews). Each layer offsets slightly from the one below, producing the organic appearance of real wood grain.
The main branches extend from the trunk using ball-joint connections that allow positioning adjustments. These joints feel loose initially, but they hold position once you add the foliage weight. Build each branch completely before attaching it to the trunk, this prevents stress on the connections while you're working.
Honestly, some branches use clever internal structures that aren't visible in the finished model but provide the strength needed to support dozens of leaf elements.
Phase 3: Attaching Foliage Elements (Bags 7-9)
The foliage phase consumes 1.5 to 2 hours and tests your patience more than your building skill. You'll attach individual pink frogs (for cherry blossoms) or green leaf clusters to specific connection points on each branch. The instructions show exactly where each piece goes, but the repetitive nature of attaching 30+ small elements can feel tedious (according to Reddit feedback).
Each frog piece clips onto a small bar element, and the green leaves attach to studs. The connection points are designed to create natural-looking foliage distribution, but you have artistic freedom in the exact positioning. Some builders cluster pieces more densely, while others spread them for a sparser appearance.
Take breaks during this phase. Your hands will appreciate the rest, and stepping back periodically lets you assess the overall foliage distribution before committing to every placement.
Common Building Challenges and Solutions
Three specific issues arise frequently enough that addressing them directly saves you troubleshooting time during your build.
Dealing with Small Pieces and Frog Elements
The pink frog pieces measure roughly 1x1 studs, making them challenging to grip and position accurately. Use your fingernail edge to press them onto their connection bars rather than trying to pinch them between fingers. Tweezers help if you have them available, though standard household tweezers work better than precision hobby tweezers for this application.
Builders with reduced dexterity or vision challenges should consider working in shorter sessions during the foliage phase. Attaching 10-15 pieces, then taking a break maintains accuracy without causing hand fatigue. The green leaf elements are slightly larger and easier to handle than the frogs.
Drop a piece? They bounce and scatter across floors. Work over a light-colored cloth or tray that catches dropped elements and makes them visible against the background.
Understanding the Instruction Quality Issues
The printed instruction booklet's low resolution creates genuine difficulty identifying small pieces in the parts inventory diagrams. Reddit users specifically mention this issue affecting the foliage attachment steps where multiple similar-looking small pieces appear in the same step.
The digital PDF from LEGO's website solves this problem with sharper images. Display it on a tablet propped at viewing angle, or use your phone with a stand. Some builders print specific problematic pages from the PDF at home for clearer reference.
Branch Positioning and Stability Tips
The ball-joint connections allow branch positioning but can feel unstable during construction. This is normal, the joints rely on friction rather than clicking connections. Each branch should hold its position without drooping, but you can adjust angles freely.
For authentic bonsai appearance, position branches at varied angles rather than symmetrically. Real bonsai rarely have perfectly balanced branch distribution. Angle some branches slightly upward, others more horizontal, creating visual interest and naturalistic form.
If a branch feels genuinely loose, disassemble the connection and check that the ball joint seated completely into its socket.
Customization Options and Display Tips
The included pieces support two complete foliage options, and the LEGO community has developed additional modifications that extend the set's possibilities.
Switching Between Cherry Blossoms and Green Leaves
Swapping from one foliage type to the other takes 30-45 minutes once you're familiar with the attachment points. Remove all existing foliage elements from the branches, then attach the alternative pieces using the same connection points. The instructions show both options, so you can reference either section during the swap.
Store the unused foliage pieces in a labeled container or bag. The pink frogs particularly benefit from separate storage since they're easy to lose among other small LEGO elements. Some builders swap foliage seasonally, green leaves during spring and summer, pink blossoms for winter and early spring display.
Alternative Build Ideas and MOCs
Rebrickable hosts community-designed alternate builds using the 10281 pieces. These modifications range from simple foliage rearrangements to complete redesigns that create different tree species or multiple smaller trees from one set's pieces.
You can combine pink and green elements for a transitional spring appearance, or modify branch angles dramatically for windswept styling. The ball joints and modular foliage design specifically support experimentation without permanent modifications.
Display and Long-Term Care
Position your completed bonsai away from direct sunlight, which fades the pink frog pieces over months of exposure. The brown and green elements show more UV resistance, but prolonged sun exposure affects all LEGO colors eventually. Shelf or desk locations with indirect lighting preserve the colors while providing visibility.
Dust accumulation between foliage elements requires periodic attention. Use a soft brush or compressed air to remove dust without disassembling the tree. The official LEGO care instructions recommend avoiding liquid cleaners, which can leave residue or affect the plastic's surface finish over time.
The model's base provides stability, but the top-heavy foliage makes it vulnerable to tipping. Place it where it won't get bumped by passing traffic, the completed tree weighs enough to stay put under normal conditions but won't survive a tumble from shelf height without pieces separating.
I keep my LEGO bonsai on the same shelf where I cure collected yamadori wood for deadwood features—both need protection from direct handling and curious pets. After three months, I noticed how dust settled into the pink frog elements exactly like pollen accumulates in the crevices of real Prunus mume bark, requiring the same gentle brush I use to clean delicate jin on my Japanese maples. The plastic tree taught me patience in an unexpected way: dusting those hundreds of tiny elements weekly became a meditation similar to the careful needle-plucking sessions my pines require each spring.
Related Articles
- LEGO Bonsai Tree: Review, Instructions & Display Ideas
- LEGO Trees Collection: Bonsai, Botanical & More
- Complete Guide to Bonsai Trees: Care, Types & Growing Tips
- Bonsai Tree Wiring: Techniques for Shaping & Training
- Bonsai Tree Types: 15+ Species for Every Skill Level
Frequently Asked Questions
How long does it take to build the LEGO Bonsai Tree Set 10281?
Most builders complete the set in 3-4 hours total. The foliage attachment phase typically consumes about half of that time, as attaching small leaf and flower elements requires careful precision and attention to detail.
Should I use the printed instructions or the digital PDF?
Use both: keep the printed booklet handy for tracking overall progress, but reference the digital PDF from LEGO's website for detailed steps, as it offers much sharper image quality. The LEGO Builder app provides an interactive 3D alternative if you prefer zooming into specific angles.
Can I build both the green and pink cherry blossom versions?
Yes, the set includes two complete foliage options: 30 pink frog pieces for the cherry blossom version and green frog elements plus leaf pieces for the traditional green tree. You can switch between them or even create a hybrid display.
What's the biggest challenge when building this set?
The foliage attachment phase is the most challenging part, as you'll be working with numerous tiny pieces and frog elements that must connect to specific points on the branches. Good lighting and a magnifying glass are highly recommended for this phase.
How should I organize my workspace before starting?
Set up a flat surface where your build can remain undisturbed, use small bowls or sorting trays to organize pieces from each numbered bag, and ensure strong overhead lighting. A comfortable chair is also important for the 3-4 hour build session.
How many pieces and colors are in this set?
The set contains 878 total pieces in 109 unique part designs across 28 different colors, providing the variety needed to create a realistic bonsai tree appearance.
What are the final dimensions of the completed model?
The finished LEGO Bonsai Tree measures over 7 inches high, 8 inches long, and 7 inches wide, making it substantial enough for desk or shelf display without taking up excessive space.