Bonsai Tree Repotting: Step-by-Step Guide & Best Practices
Bonsai tree repotting maintains your tree's health by refreshing depleted soil and managing root growth within the confined space of a container. Most young bonsai need repotting every two to three years, while mature specimens can wait three to five years between sessions (according to Penn State Extension). You'll know it's time when roots protrude from drainage holes, water pools on the soil surface instead of absorbing, or your tree shows reduced vigor despite proper care. The process involves removing the tree, pruning circling roots, and replanting in fresh, fast-draining soil, typically a mix of akadama, pumice, and lava rock rather than organic potting soil.
Table of Contents
- Why and When Your Bonsai Tree Needs Repotting
- Understanding Root Development and Soil Degradation
- Visual Signs Your Bonsai Needs Repotting
- Species-Specific Timing Guidelines
- Essential Tools and Materials for Successful Repotting
- Must-Have Tools and Ergonomic Alternatives
- Choosing the Right Soil Mix and Pot
- Step-by-Step Repotting Process
- Preparing the Tree and New Pot
- Removing the Tree from Its Current Pot
- Root Pruning Techniques and Limits
- Positioning and Securing in the New Pot
- Final Steps and Initial Watering
- Post-Repotting Care and Recovery Timeline
- Immediate Aftercare: First Two Weeks
- Transitioning Back to Normal Care
- Warning Signs and How to Respond
- Common Mistakes and How to Avoid Them
Why and When Your Bonsai Tree Needs Repotting
Your bonsai lives in a deliberately restricted environment, which creates specific challenges that don't resolve themselves over time. The roots grow continuously, seeking nutrients and water, but they have nowhere to go except around and around the pot's interior walls. Meanwhile, the soil that sustains your tree gradually breaks down from watering cycles, microbial activity, and the physical pressure of root expansion. These two processes, root crowding and soil degradation, eventually compromise your tree's ability to thrive, regardless of how carefully you water or fertilize.
Understanding Root Development and Soil Degradation
When roots reach the container wall, they follow the path of least resistance and begin circling the pot's perimeter. This circling pattern restricts water and nutrient uptake because the roots can't spread naturally to access fresh resources (according to the USDA Forest Service). Over months and years, these circling roots form a dense mat that prevents water from penetrating to the center of the root ball.
Simultaneously, your bonsai soil loses its structure. The mineral components that create air pockets and drainage channels gradually break into smaller particles through freeze-thaw cycles, the mechanical action of watering, and simple weathering. Well, this degradation means the soil holds more water and less air, creating conditions where roots struggle to breathe and become vulnerable to rot.
Visual Signs Your Bonsai Needs Repotting
The most obvious indicator appears at the drainage holes, roots emerging from the bottom of the pot signal that the root system has run out of space to expand. You might also notice water sitting on the soil surface for several seconds before slowly absorbing, which indicates the soil has become compacted or the root mass is so dense that water can't penetrate.
Check the pot edges by gently pressing the soil near the rim. If the soil pulls away from the container walls, creating a visible gap, the root ball has contracted from dehydration because water runs down this gap instead of through the soil. Reduced vigor provides another clue: shorter annual growth, smaller leaves, or pale foliage despite regular fertilization all suggest your tree can't access the nutrients it needs.
When you lift the tree from its pot during inspection, healthy roots should appear firm and white or tan at the tips, with a balanced distribution throughout the soil. If you see mostly brown, circling roots with few fine feeder roots visible, repotting will stimulate fresh root development.
Species-Specific Timing Guidelines
Early spring, just before buds swell, offers the optimal repotting window for most deciduous species like maples and elms (according to Penn State Extension). At this point, the tree remains dormant but stands ready to enter vigorous growth, allowing it to quickly establish new roots in fresh soil. For Japanese maples specifically, wait until you see the slightest hint of bud movement but before leaves emerge, typically late February through March in temperate zones.
Junipers and other conifers tolerate repotting in early spring as well, though mature pines prefer slightly later timing in mid-spring when you can see new candle growth beginning. These slow-growing species need repotting less frequently, often every three to five years, because their root systems expand more gradually.
Tropical and subtropical species like ficus follow different rules entirely. Since they don't experience true dormancy, you can repot them during their active growing season, late spring through early summer in most climates. Chinese elms, which blur the line between temperate and tropical depending on variety, do best with early spring repotting in cooler climates but can handle summer repotting in consistently warm regions.
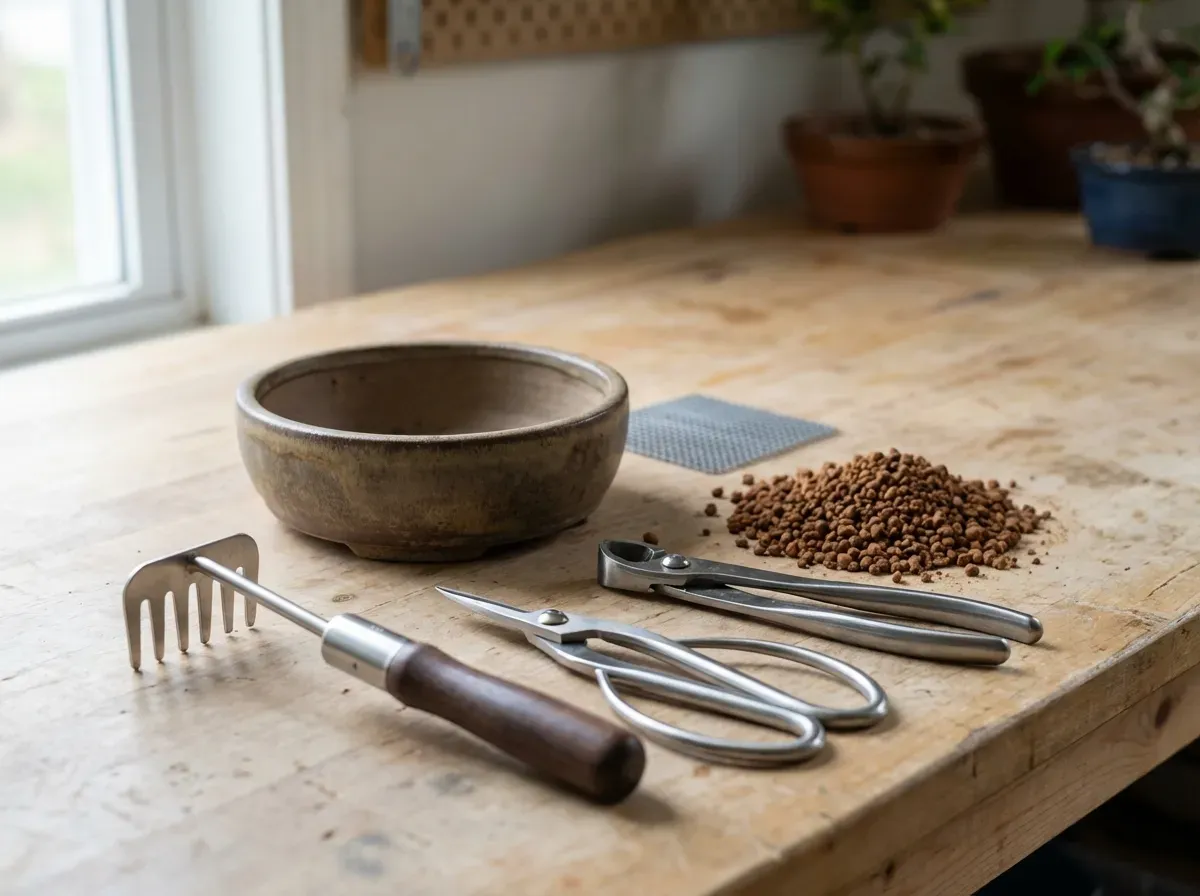
Essential Tools and Materials for Successful Repotting
Gathering your supplies before you begin prevents the rushed mistakes that happen when you're holding a bare-root tree and realize you're missing a critical item. You don't need expensive specialty tools to repot successfully, but certain implements make the work significantly easier and reduce strain on your hands during the detailed root work that repotting requires.
Visual Signs Indicating Your Bonsai Needs Repotting
| Sign | What to Look For | What It Indicates |
|---|---|---|
| Roots at Drainage Holes | Roots protruding from bottom of pot | Root system has run out of space to expand |
| Poor Water Absorption | Water pools on soil surface for several seconds before absorbing slowly | Soil is compacted or root mass is too dense for water penetration |
| Soil Pulling Away from Edges | Visible gap between soil and container walls when you press near the rim | Root ball has contracted from dehydration; water running down the gap instead of through soil |
| Reduced Vigor | Shorter annual growth, smaller leaves, or pale foliage despite regular fertilization | Tree cannot access nutrients it needs |
| Unhealthy Root Appearance | Mostly brown, circling roots with few fine feeder roots visible | Fresh root development needed; healthy roots appear firm and white or tan at tips |
Once you've identified these warning signs, consult the repotting schedule below to determine the ideal timing for your specific bonsai species.
Bonsai Repotting Frequency and Optimal Timing by Species
| Species Type | Repotting Frequency | Optimal Timing | Key Notes |
|---|---|---|---|
| Deciduous (Maples, Elms) | Every 2-3 years (young), 3-5 years (mature) | Early spring, just before bud swell | Repot while dormant but before vigorous growth begins |
| Japanese Maples | Every 2-3 years (young), 3-5 years (mature) | Late February through March | Wait for slightest bud movement but before leaves emerge |
| Junipers & Conifers | Every 3-5 years | Early spring; mature pines mid-spring | Slow-growing species need less frequent repotting |
| Mature Pines | Every 3-5 years | Mid-spring when candle growth visible | Prefer slightly later timing than other conifers |
| Tropical/Subtropical (Ficus) | Every 2-3 years (young), 3-5 years (mature) | Late spring through early summer | No dormancy period; can repot during active growing season |
| Chinese Elms | Every 2-3 years (young), 3-5 years (mature) | Early spring (cool climates); summer (warm regions) | Timing depends on local climate conditions |
Must-Have Tools and Ergonomic Alternatives
A root hook or root rake allows you to gently tease apart the root mass without tearing delicate feeder roots. If you have reduced hand strength, look for tools with thick, cushioned handles that distribute pressure across your palm rather than concentrating it in your fingers. Some practitioners prefer bent-nose tweezers for precision work on fine roots, though a simple chopstick works remarkably well for most tasks.
Sharp scissors or shears designed for root pruning cut cleanly without crushing root tissue. Bypass-style pruners create cleaner cuts than anvil types, which can compress and damage roots. For those with arthritis concerns, ratcheting pruners require less grip strength because they cut in stages rather than demanding sustained pressure.
A wooden chopstick or bamboo skewer becomes indispensable for working fresh soil into the root mass and removing old soil from between roots. The slightly rough texture grips soil particles without damaging roots. Keep several on hand, as they occasionally split during vigorous use.
Choosing the Right Soil Mix and Pot
Bonsai soil differs fundamentally from garden soil or standard potting mix. You need a fast-draining blend that consists primarily of inorganic components: akadama (Japanese fired clay), pumice, and lava rock in various proportions (according to the Chicago Botanic Garden). Pre-mixed bonsai soil from reputable suppliers ensures consistent particle size and proper drainage, which matters more than the exact ratio of components.
For deciduous trees, a mix with slightly more akadama retains adequate moisture between waterings. Conifers prefer more pumice and lava rock for sharper drainage. If mixing your own, sift the components to remove dust and fine particles that clog air spaces, this step makes a measurable difference in root health over the years.
Select a new pot that's slightly larger than the previous one, not dramatically bigger. The pot should accommodate the root ball with about one inch of fresh soil around the edges. Ceramic and stoneware pots provide better temperature stability than plastic, though plastic works fine for development and training. Verify that drainage holes are adequate, at least one hole per four inches of pot diameter.
Step-by-Step Repotting Process
The actual repotting sequence follows a logical progression from preparation through final watering, with each step building on the previous one. Expect to spend 30 to 90 minutes on a typical repotting session, depending on the tree's size and root complexity. Taking breaks during detailed root work helps you maintain focus and avoid hasty cuts you'll regret later.
Preparing the Tree and New Pot
Water your bonsai thoroughly the day before repotting. Moist roots handle manipulation better than dry ones and are less likely to tear during combing. Prepare the new pot by securing plastic mesh over the drainage holes with wire to prevent soil from washing out. Cut anchor wires long enough to thread through the drainage holes and secure the tree, typically two wires forming an X pattern across the pot bottom.
Removing the Tree from Its Current Pot
Run a thin blade or root hook around the inside edge of the pot to separate any roots that have attached to the container walls. Turn the pot on its side and gently tap the rim against your work surface to loosen the root ball. If the tree resists, work a chopstick through the drainage holes to push from below rather than pulling on the trunk, which can damage the nebari where trunk meets roots.
For severely pot-bound trees, you may need to sacrifice the pot by breaking it. This happens, don't force a tree out and risk trunk damage to save a container. Once free, set the tree on your work surface and take a moment to examine the root structure before making any cuts.
Root Pruning Techniques and Limits
Begin by using your root hook to gently comb soil away from the outer edges of the root ball, working from the perimeter toward the center. Remove roughly one-third of the old soil, focusing on the outer portion where roots have circled. You'll see a mix of thick structural roots and fine feeder roots, the feeder roots look like white or tan threads and these are what you want to preserve.
Prune circling roots that run around the perimeter, cutting them back to where they branch from a radial root that extends outward from the trunk. Root pruning stimulates new feeder root development near the trunk, which improves nutrient absorption (according to the USDA Forest Service). For young, vigorous trees, you can safely remove up to one-third of the root mass. Mature trees tolerate less aggressive pruning, limit yourself to 20-25% removal.
Look, the goal isn't to create a perfectly symmetrical root ball. You're establishing a foundation of roots that radiate outward from the trunk like wheel spokes, with healthy feeder roots distributed throughout. Take your time with this step, rushing leads to excessive pruning that weakens the tree's recovery ability.
Positioning and Securing in the New Pot
Create a small mound of fresh soil in the center of the pot to support the root ball at the proper height. The tree should sit at the same depth it occupied previously, with the nebari visible just above the soil line. Position the trunk at the desired angle, considering the front viewing angle you've established for the tree.
Thread the anchor wires over the root ball and twist them gently to secure the tree without crushing roots. The tree should not move when you gently push the trunk, stability during the recovery period prevents root damage and allows new roots to establish quickly. Work fresh soil into the root mass using a chopstick, poking vertically to eliminate air pockets while avoiding excessive pressure that compresses the soil.
Final Steps and Initial Watering
Once soil fills the pot to within a quarter-inch of the rim, water thoroughly using a gentle spray until water runs clear from the drainage holes. This initial watering settles the soil and ensures good contact between roots and growing medium. Add more soil if settling creates depressions, then water again.
Apply a thin layer of top dressing if desired, though this serves aesthetic purposes rather than functional ones. Label the pot with the repotting date using a waterproof marker or tag, you'll appreciate this reference when planning future repotting schedules.
Post-Repotting Care and Recovery Timeline
Your bonsai needs modified care during the weeks following repotting because the pruned root system can't immediately support the full canopy's water and nutrient demands. Understanding normal recovery patterns helps you distinguish expected stress responses from genuine problems that require intervention.
Immediate Aftercare: First Two Weeks
Place the newly repotted tree in a shaded, protected location away from direct sun and wind for the first two weeks. Even sun-loving species need this recovery period because their reduced root mass can't replace water lost through transpiration at normal rates. A covered porch or shade structure provides ideal conditions, enough light for photosynthesis but without the intensity that stresses a compromised root system.
Water when the soil surface begins to dry, which may be less frequently than before repotting since the fresh soil retains moisture differently than degraded soil. Check daily by pressing your finger into the soil, it should feel barely moist an inch below the surface. Some leaf yellowing or drop is normal, particularly for deciduous species, as the tree adjusts its canopy to match its temporarily reduced root capacity.
Avoid fertilizing during this initial recovery period. The tree needs to focus energy on root regeneration rather than top growth, and fresh bonsai soil contains sufficient nutrients for several weeks (according to Harvard's Arnold Arboretum).
Transitioning Back to Normal Care
After two weeks, gradually reintroduce the tree to brighter light over three to four days. Move it to partial sun for a few days, then to its normal growing location. Watch for signs of stress during this transition, if leaves wilt during the day, move back to more shade for another week before trying again.
Resume fertilization four to six weeks after repotting, starting at half-strength for the first two applications. New growth emerging from buds signals successful root establishment and indicates the tree can support normal care routines. Deciduous trees typically show new leaves three to four weeks after spring repotting, while conifers display fresh needle growth somewhat later.
Warning Signs and How to Respond
Excessive leaf drop, more than 30% of the canopy, suggests the root pruning was too aggressive or the tree is staying too wet. Reduce watering frequency and ensure the pot has adequate drainage. If the soil smells sour or you see mold on the surface, the soil may be staying saturated, which suffocates roots and promotes rot.
Wilting despite moist soil indicates root damage or disease rather than water shortage. Check that the tree remains stable in the pot, if it wobbles, the roots aren't anchored properly and can't absorb water efficiently. You may need to re-secure the anchor wires without disturbing the root ball further.
Honestly, most repotting problems stem from impatience: returning trees to full sun too quickly, fertilizing too soon, or overwatering because you're anxious about the tree's recovery. Give your bonsai time to heal and establish new roots before expecting normal growth patterns to resume.
Common Mistakes and How to Avoid Them
Repotting errors typically cluster around timing, technique, and aftercare. The most frequent mistake involves waiting too long between repotting sessions until the root mass becomes so dense that aggressive pruning becomes necessary, which stresses the tree more than regular maintenance would. Schedule repotting based on root development rather than calendar years, some vigorous trees need annual attention while others wait five years comfortably.
Using garden soil or standard potting mix instead of proper bonsai soil causes persistent problems. These organic materials retain too much water and break down quickly in the shallow bonsai pot environment, leading to root rot and poor aeration. The extra cost of bonsai-specific soil pays for itself in tree health and reduced repotting frequency.
Skipping the anchor wires or securing them too loosely allows the tree to shift in the pot, breaking newly forming roots each time the tree moves. This extends recovery time significantly and can cause decline in severe cases. Take the extra two minutes to properly secure the tree, it makes a measurable difference in establishment success.
I learned the anchor wire lesson the hard way with a fifteen-year-old Japanese maple that seemed fine after repotting—until a week later when I noticed it rocking slightly in spring winds. By the time I resecured it properly, the fresh root tips had already sheared off where they'd just begun reaching into new soil. That tree took nearly eight weeks longer to show new growth compared to its companion maple that I'd wired correctly from the start, and the side-by-side comparison made the cost of my impatience painfully clear.
"The most common mistake I see is people underestimating the importance of post-repotting stability," says Boon Manakitivipart, internationally recognized bonsai master and instructor at Bonsai Boon in California. "When a tree moves even slightly, those delicate new root tips that are just forming get damaged. It's like trying to heal a cut while someone keeps reopening it—the recovery period extends dramatically."
Related Articles
- Bonsai Tree Care: Complete Maintenance Guide for Beginners
- Bonsai Tree Care: Expert Guide to Watering, Pruning & Maintenance
- How to Water Bonsai Trees: Complete Watering Guide
- Bonsai Tree Wiring: Techniques for Shaping & Training
- Complete Guide to Bonsai Trees: Care, Types & Growing Tips
- Bonsai Tree Growth: Understanding Development Stages
Frequently Asked Questions
Can I repot my bonsai tree during summer or fall, or must it be spring?
While early spring is optimal for most species, you can repot during summer or fall if necessary, though recovery will be slower. Avoid repotting during the tree's dormant winter period or during active flowering, as this stresses the tree when it's least able to recover. If your bonsai shows severe signs of distress (waterlogging, root rot), repot immediately regardless of season rather than waiting.
How much of the root system can I safely prune during repotting?
You can safely remove up to one-third of the root mass, focusing on circling roots and dense root mats. Always preserve fine feeder roots (the thin, white root tips) as these absorb water and nutrients. If your tree is severely root-bound with mostly circling roots, you may need to prune more aggressively, but do this gradually over multiple repottings rather than all at once.
What should I do if my bonsai shows warning signs after repotting?
The article mentions warning signs exist but doesn't detail them in the provided text. Common post-repotting issues include wilting (reduce watering slightly), yellowing leaves (ensure proper drainage), or leaf drop (normal stress response—maintain consistent care). If problems persist beyond 3-4 weeks, check that the soil isn't waterlogged and that the tree receives appropriate light for its species.
Can I use regular potting soil instead of the akadama, pumice, and lava rock mix?
No—regular organic potting soil is not suitable for bonsai. It retains too much moisture and compacts over time, leading to root rot and poor drainage. Bonsai requires fast-draining mineral mixes like akadama, pumice, and lava rock that allow air circulation and prevent waterlogging in the confined container environment.
How long does it take for a bonsai to recover after repotting?
The first two weeks require careful aftercare with reduced watering and protected placement away from direct sun. Most bonsai fully transition back to normal care within 3-4 weeks, though complete root establishment can take 2-3 months. You should see new growth resuming within 4-6 weeks if repotting was successful.
Do all bonsai species need repotting on the same schedule?
No—young bonsai typically need repotting every 2-3 years, while mature specimens can wait 3-5 years. Additionally, species vary: deciduous trees like maples and elms follow one schedule, while slow-growing conifers like pines need repotting less frequently. Check your specific species' guidelines and inspect for visual signs rather than following a rigid timeline.
What's the best way to inspect my bonsai's roots to determine if repotting is needed?
Gently remove the tree from its pot and examine the root structure. Healthy roots should be firm and white or tan at the tips with balanced distribution. If you see mostly brown circling roots with few fine feeder roots, or if roots emerge from drainage holes, repotting is needed. Also check if soil pulls away from container walls, indicating the root ball has contracted.